Building a REST API for Question Answering With Haystack
If you are building web or mobile application with a question answering component, here's how to use Haystack REST API.
17.08.21

Many of our tutorials cover using Haystack’s Python bindings. But if you are building web or mobile applications with a question answering (QA) component, the preferred solution is to create a REST API powered by Haystack under the hood. Here are a few common use cases:
- Question answering functionality on your website or in your mobile app, including as a chatbot (Extractive Question Answering, where answers are “extracted” from the body of text).
- Generative Question Answering, where answers are “generated” from existing examples of questions and correct answers.
- FAQ search: generating answers to questions based on a corpus of existing questions and answers.
- Search in text-based internal systems, like financial reports or legal case search systems (Document Search).
In this article, we walk you through deploying a simple Haystack API for an Extractive QA system that uses an Amazon review set of automotive replacement parts. Let’s dive in!
Why use an API for question answering?
An application programming interface (API) is a common way to allow individual computer systems to interact with each other. Most modern web services, from Twitter to the e-commerce platform Shopify, offer HTTP APIs. Third-party developers can use these APIs to integrate the services with their products.
For instance, a developer might add a “Pay Now” button to their website, or embed a live stream of Twitter’s trending hashtags. These days, whenever an application includes an interaction with another web service, it most probably does so via an HTTP-based REST API.
A question answering API is a production-ready way to embed semantic search capabilities into a website or mobile app.
An example use case for a question answering API is implementing a search feature for a website. Once the question answering API is deployed on the back end and connected to the search box, users can type in natural language questions. When the user clicks the “Search” button, an HTTP request is sent to the API. The API server then processes the request and returns relevant answers to the user’s questions as an API response.
The architecture of a Haystack-powered REST API
Here’s an illustration of a simple Haystack REST API:
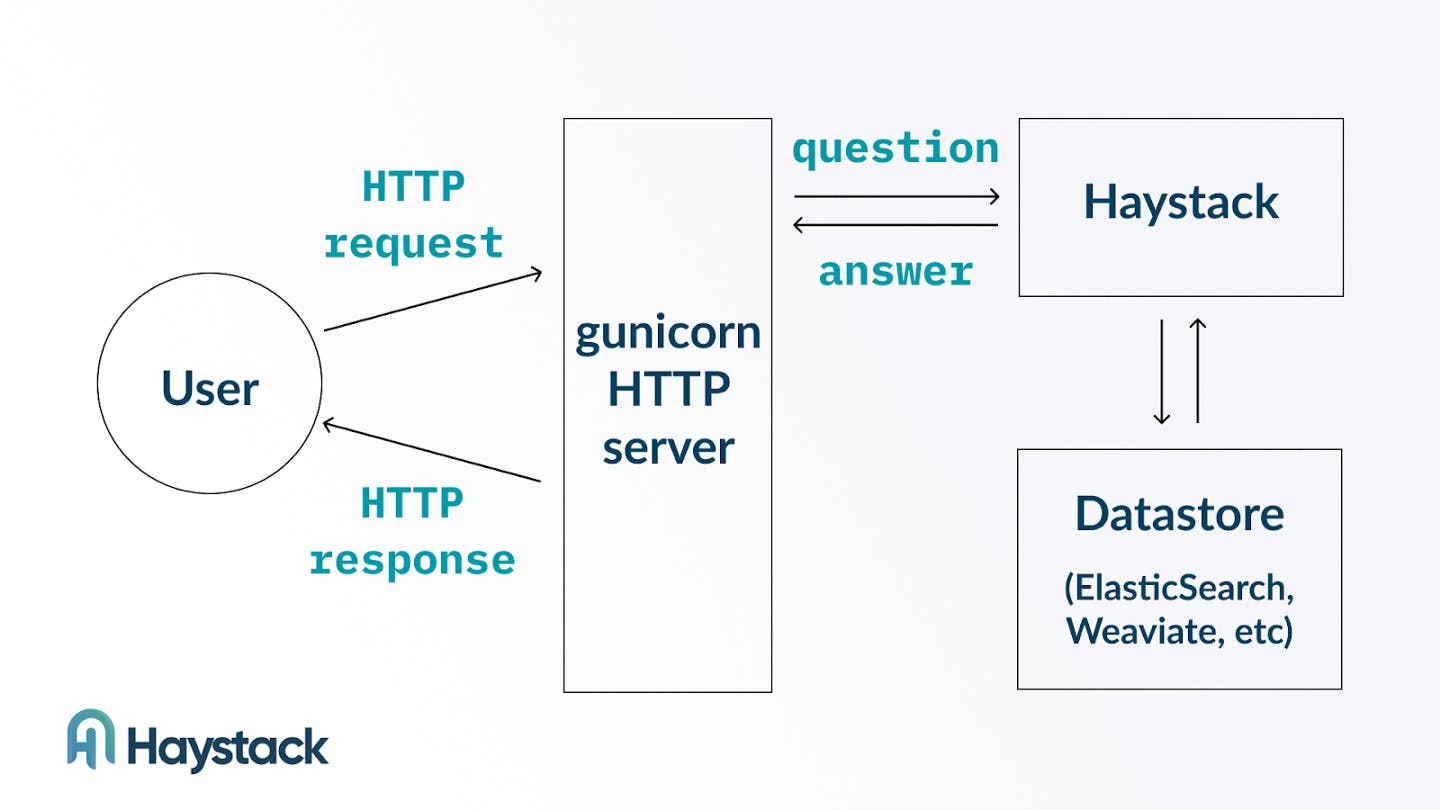
Here the HTTP part of the API is taken care of by a gunicorn HTTP server. The server interfaces with the Haystack libraries and passes on the information from the body of a HTTP request into a Haystack pipeline.
On the back-end side, the Haystack pipeline receives the query and runs it through the components of the pipeline graph. An Extractive QA pipeline, for example, typically consists of a Retriever and a Reader. The retriever connects to a datastore (like Elasticsearch or Weaviate) to fetch the relevant data.
In the following sections, we demonstrate how to initialize a Haystack API, add data to the underlying datastore, and interact with the API with tools like curl.
Initializing the Haystack API infrastructure
Our recommended way of deploying a Haystack API is to run the application as a Docker container. Containers require little effort to operate in both development and production environments, since all necessary dependencies are already included inside a Docker container.
For development environments, Haystack provides a docker-compose file that you can use to start all the containers required for a Haystack API. In a production environment, many organizations already use a system like Kubernetes to manage numerous containers running in parallel.
In this article, we’ll use docker-compose to start the Haystack API containers. To follow along, make sure that you have Docker and docker-compose pre-installed on your machine. We’ll be downloading some fairly large containers, so you’ll also need a fast internet connection.
We’ll be setting up the Haystack REST API on an AWS EC2 instance, but you can use your development machine or a virtual machine in another cloud provider. Here are the details of the machine used for this tutorial:
- EC2 instance type: t3.xlarge
- Specifications: 4 vCPUs, 16GB RAM
- Amount of disk space: 300GB
- AMI: Ubuntu 18.04 Deep Learning AMI
- Note: we chose this AMI because it contains pre-installed dependencies like CUDA and PyEnv that both enable production use of Haystack and facilitate getting started for development purposes. You could go with a different AMI but that might require you to install and configure dependencies manually before you are able to run Haystack.
Once our EC2 instance has started, we’ll log into it using SSH and run the following commands to download the Haystack repository and then pull all the Docker images that are required to run Haystack:
$ git clone https://github.com/deepset-ai/haystack.git
$ cd haystack
$ docker-compose pullThe pull command can take a few minutes to finish while Docker downloads many large files.
When the above commands have finished running, we can proceed to add data to our Haystack index.
Adding data to the Haystack index
To enable Haystack to serve answers to questions over the REST API, we’ll need to point the Haystack components to an underlying datastore like Elasticsearch or Weaviate. We’ll use Elasticsearch as our datastore.
We’ll go with the indexing script option. This is our recommended option for API use cases. When taking this approach, developers create a Python script that runs once or periodically, and use that script to parse and load data into the datastore.
(An alternative option would be to use the Haystack API to load individual data points instead. Loading data through the Haystack API is a better option when the data used for QA is updated continuously rather than extracted from an existing dataset.)
The containers that are needed to run a Haystack API are defined in a docker-compose.yml file. The specific docker-compose.yml file that we’re using is located in the Haystack repository, and we already downloaded it when cloning the Haystack repo from GitHub.
To import our data, we’ll need to make sure that Elasticsearch is running. The following command starts the Elasticsearch Docker container — but not the other containers in our docker-compose.yml file:
$ docker-compose up elasticsearchAfter a short delay, the Elasticsearch container will be up and running.
With the datastore container running, we’re now ready to start indexing our data. We’ll be using the “Automotive” slice from the Amazon Reviews dataset. Let’s parse the dataset and load it into the datastore in our Python script:
import pandas as pd
reviews = pd.read_json('reviews_Automotive_5.json', lines=True)
texts = reviews.reviewText.values
ids = reviews.asin.values
dicts = [{'text': text, 'meta':{'item_id': id_}} for text, id_ in zip(texts, ids)]We use Pandas to read our automotive reviews JSON file, and then build an array of Python dictionaries that contain the reviews and their item IDs. Next, we pre-process the review data:
from haystack.preprocessor import PreProcessor
processor = PreProcessor(split_by='word',
split_length=100,
split_respect_sentence_boundary=False,
split_overlap=5)
docs = [processor.process(d) for d in dicts]
flattened_docs = [d for list_of_dicts in docs for d in list_of_dicts]
random.choice(flattened_docs)Note: The next Haystack release will include an amended process() function which takes in and returns a list of documents, shortening the last two lines to: docs = processor.process(dicts).
The final step in our indexing script is to load the pre-processed information into Elasticsearch:
from haystack.document_store import ElasticsearchDocumentStore
document_store = ElasticsearchDocumentStore()
document_store.delete_documents()
document_store.write_documents(flattened_docs)In about a minute (depending on your machine’s performance — it took about a minute on our AWS instance) you’ll see the logs from Haystack’s communication with Elasticsearch:
...
08/03/2021 09:32:03 - INFO - elasticsearch - POST http://localhost:9200/_bulk?refresh=wait_for [status:200 request:1.163s]
08/03/2021 09:32:04 - INFO - elasticsearch - POST http://localhost:9200/_bulk?refresh=wait_for [status:200 request:1.022s]
08/03/2021 09:32:05 - INFO - elasticsearch - POST http://localhost:9200/_bulk?refresh=wait_for [status:200 request:1.051s]
...When the write_documents() operation finishes, our data becomes available in Elasticsearch and can be used for question answering.
Starting and querying the REST API
Our automotive dataset is now indexed in Elasticsearch. We’ll start the Haystack API container by running the following command:
$ docker-compose up -d haystack-apiWe can use this command to see which containers are currently running:
$ docker-compose ps
Name Command State Ports
--------------------------------------------------------------
haystack_elasticsearch_1 /tini -- /usr/local/bin/do ... Up 0.0.0.0:9200->9200/tcp,:::9200->9200/tcp, 9300/tcp
haystack_haystack-api_1 /bin/bash -c sleep 15 && g ... Up 0.0.0.0:8000->8000/tcp,:::8000->8000/tcpFrom the output we see that both the Elasticsearch and Haystack API containers are now running. In the Ports column, you can see that the Haystack API is running on port 8000. Let’s try querying the API on that port at the localhost address:
$ curl -H 'Content-Type: application/json' -H 'Accept: application/json' -d '{"query": "Is the replacement oil filter reliable?"}' http://127.0.0.1:8000/query | jqHere’s the output that we get in response:
{
"query": "Is the replacement oil filter reliable?",
"answers": [
{
"answer": "I'm fully satisfied with it from Amazon",
"question": null,
"score": 9.764897346496582,
"probability": 0.30580949783325195,
"context": "Mercedes-Benz E350. Amazon price is cheaper than any other auto part sellers and the OEM version of MB dealers. I'm fully satisfied with it from Amazon.",
"offset_start": 110,
"offset_end": 149,
"offset_start_in_doc": 186,
"offset_end_in_doc": 225,
"document_id": "9cc623ae2a4c634e923d93cb2b790277",
"meta": {
"item_id": "B001DRP9G4",
"_split_id": 0
}
},
{
"answer": "Phram is a excellent quality",
"question": null,
"score": 9.164022445678711,
"probability": 0.6603906154632568,
"context": "It fits perfect on my riding mower 18.5 hp B&S engine.Phram is a excellent quality replacement oil filter for my mower engine",
"offset_start": 54,
"offset_end": 82,
"offset_start_in_doc": 54,
"offset_end_in_doc": 82,
"document_id": "81ac2b88dea723db05016f17cb0e8255",
"meta": {
"item_id": "B0009IR056",
"_split_id": 0
}
},
...
]
}Success! The Haystack API gave us an answer to our question. The JSON response contains a set of answers with additional information like the context (the relevant snippet from the Amazon review) and the metadata including the Amazon item ID. If you’d like to look up a specific item from the answers on Amazon’s website, use the following link: https://www.amazon.com/dp/B0010T3QT2
Replace the part of the URL after /dp/ with the ID of the product you’d like to view.
Under the hood, the HTTP request to our API is passed on to the Haystack pipeline defined in the pipelines.yaml configuration file. Our query API endpoint is connected to a pipeline called Query, which consists of a sparse Elasticsearch Retriever and a Reader based on the roberta-base-squad2 model. If we wanted to modify the API’s behavior, we could change the pipelines.yaml configuration or adjust the API code in the search.py file.
We now have a Haystack API running on localhost, but what if we wanted to query the API on a public IP address?
Exposing the API on a public HTTP port
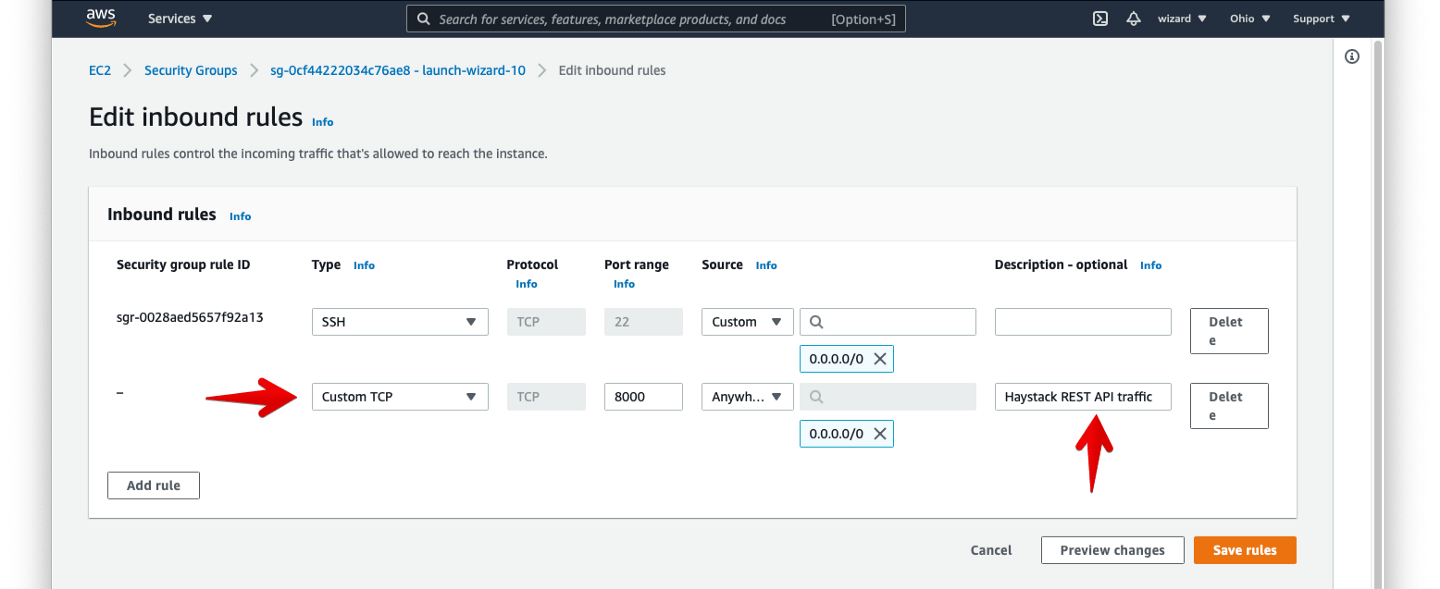
In AWS EC2, most traffic to our virtual machine is restricted by default. We now have the Haystack API server running on port 8000. In a real-world use case, however, we would query the API directly from our web or mobile application. To enable access to our Haystack API from the web, we must run the Haystack API service on a public IP address.
In EC2, the only change needed to open up port 8000 to outside access is to modify the AWS security group associated with our EC2 instance. We can make this change in the EC2 console under instance settings. Per the following screenshot, we’ll add a Custom TCP rule to allow TCP traffic on port 8000 from any address:
Once the security group is modified, we can access the API at the instance’s public IP address. Let’s try viewing the Haystack API’s Swagger documentation at http://<public-ip>:8000/docs:
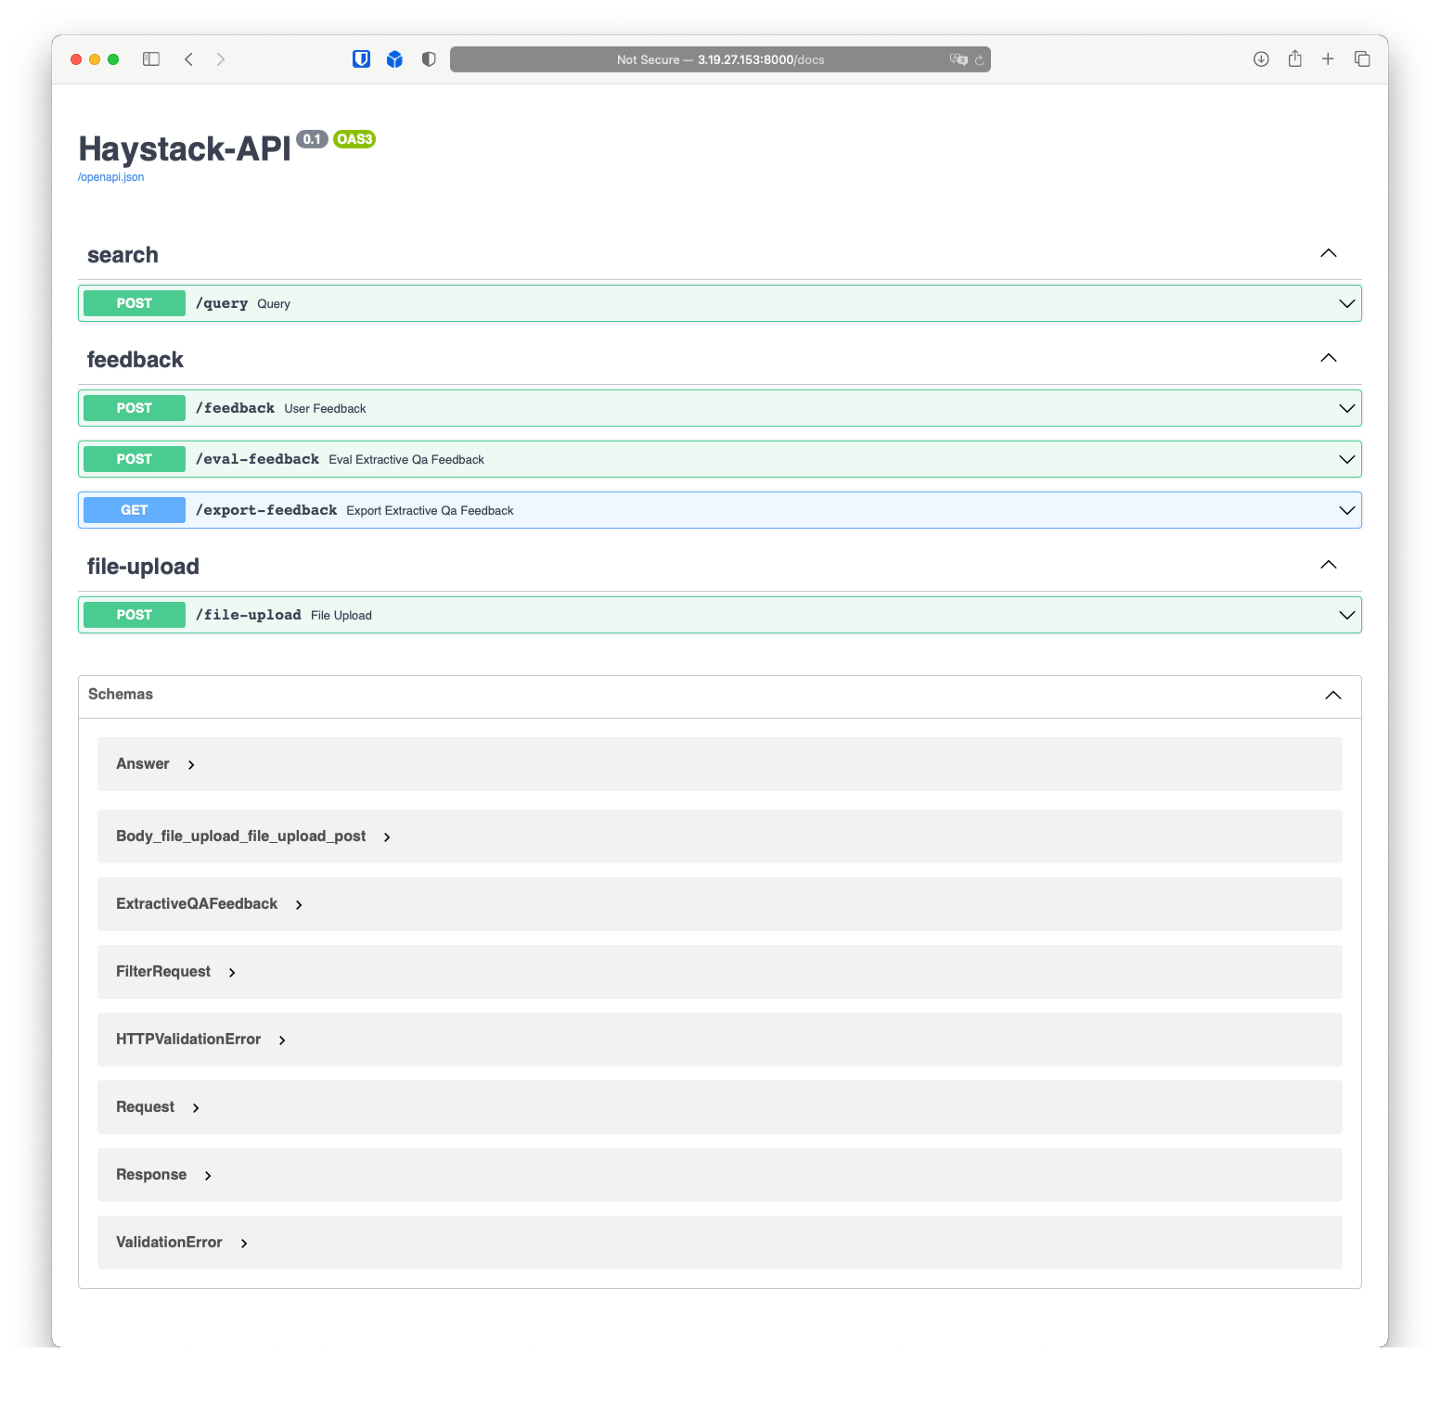
You can use the Swagger page to view the available endpoints and expected input and output formats for each endpoint. The Swagger site also includes the option to send sample API requests and inspect responses.
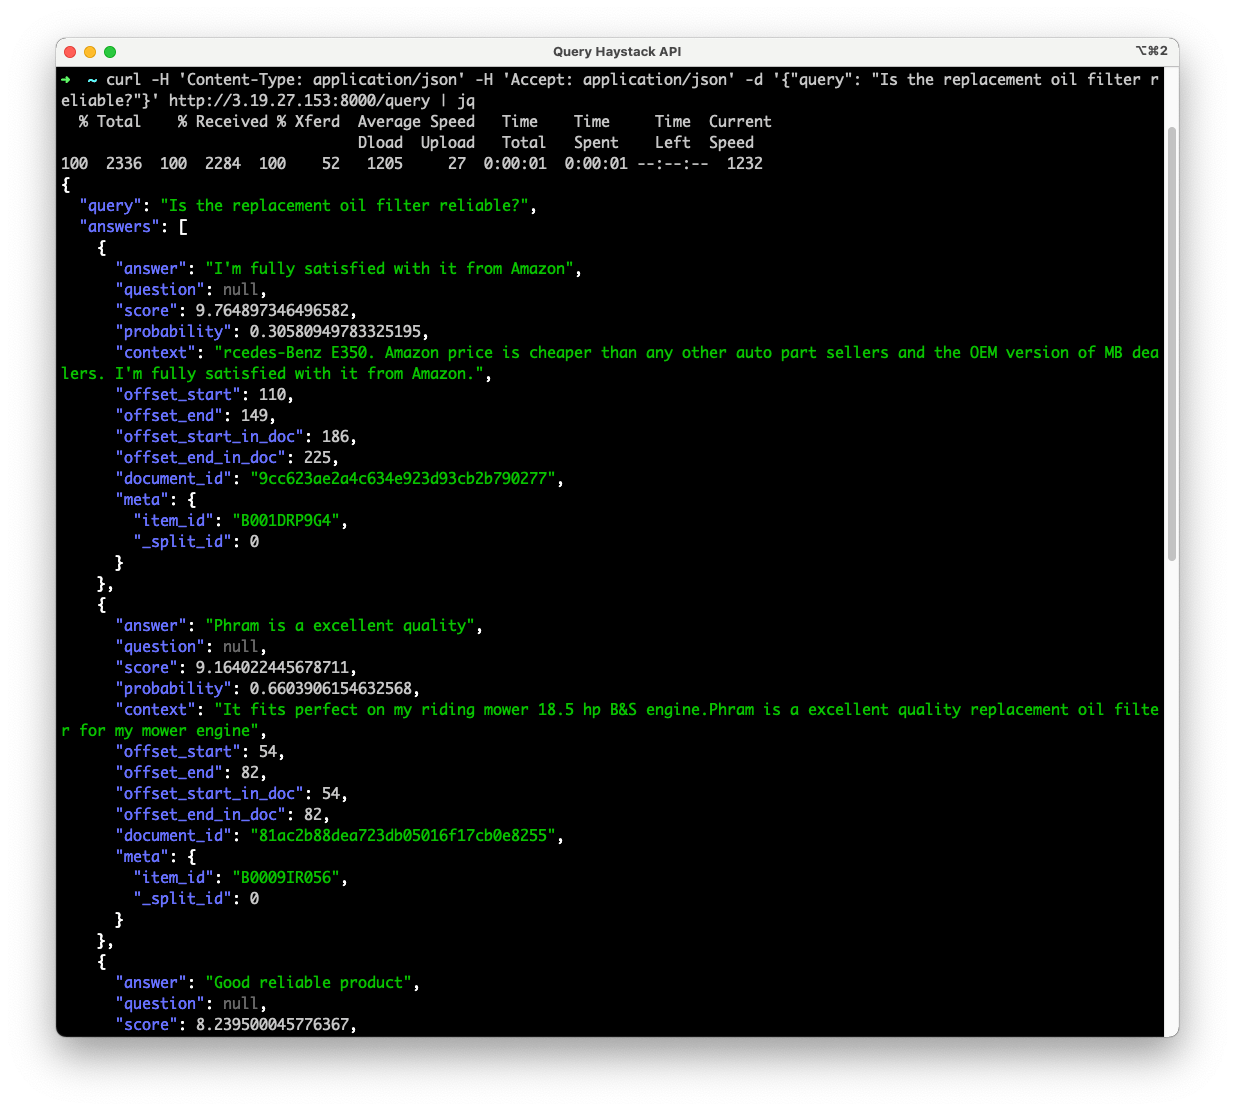
We can also confirm that our Haystack API is available at http://<public-ip>:8000. Here’s the answer to our question when we query the IP over a public IP address:
The scenario above is still a simplified one. In a production environment you would need to add a proper TLS/SSL termination for the API endpoint, and maybe some authentication too.
Adding custom API endpoints
The Haystack REST API capabilities are based on FastAPI. With FastAPI, it’s easy to add custom endpoints to the Haystack API and connect those endpoints to Haystack pipelines. Check out the Query endpoint code and follow its structure to add a new endpoint.
There are more examples of API endpoints in other files of the Haystack repository’s rest_api directory. For example, the file-upload endpoint is programmed to allow you to add new files to the Elasticsearch index using the API rather than an indexing script.
Deploy your own Haystack API
Ready to take your web or mobile app to the next level with Haystack? Give it a try with the examples above, and let us know if there are any difficulties or questions! We are always there for you in our community Discord and on GitHub.